0.简介
0.1 什么是 Consul
Consul是HashiCorp公司推出的开源工具,用于实现分布式系统的服务发现与配置。
这里所谓的服务,不仅仅包括常用的 Api 这些服务,也包括软件开发过程当中所需要的诸如 Rpc、Redis、Mysql 等需要调用的资源。
简而言之 Consul 就是根据 Key/Value 存储了一套所有服务的 IP/Port 集合,当你 Grpc 客户端需要请求某种服务的时候,具体的 IP 与端口不需要你自己来进行指定,而是通过与 Consul Agent 通信获得某个服务下面可用的 IP/Port 集合。
而 Consul 还提供了健康检查等附加的功能,你可以通过对可用服务节点的遍历来自己进行负载均衡或者服务选择。
0.2 为什么要用 Consul
没用 Consul 之前的情况是,我 new 一个 Channel 的话,需要指定 Grpc Server 的地址与端口,一单服务挂掉或者 Grpc Server 的 IP 地址或者端口有变更,那么我还得重新更改 setting 才能够使用我的服务。
使用了 Consul 之后我只需要去 Consul Agent 里面查询我指定的服务有哪些节点可用,返回给我对应的 IP 地址和端口,我就可以进行连接了。
1.准备工作
1.1 Consul 集群安装与配置
Consul 我是直接使用 Docker 的官方 Consul 镜像来进行安装的,直接执行以下命令 pull 到最新的镜像:
拿到之后我们先运行一个服务:
1
|
docker run -d --name=dev-consul-server1 -e CONSUL_BIND_INTERFACE=eth0 consul agent -server -bootstrap
|
之后我们再运行两个 Consul Server:
1
|
docker run -d --name=dev-consul-server2 -e CONSUL_BIND_INTERFACE=eth0 consul agent -server -retry-join 172.17.0.20
|
这里 172.17.0.20 是之前 dev-consul-server1 的 IP 地址。
1
|
docker run -d --name=dev-consul-server3 -e CONSUL_BIND_INTERFACE=eth0 consul agent -server -retry-join 172.17.0.20
|
我们可以运行 consul members 命令来查看 Consul 集群信息:
1
2
3
4
5
|
docker exec -t dev-consul-server1 consul members
Node          Address          Status  Type    Build  Protocol  DC   Segment
5019b941791a  172.17.0.20:8301  alive   server  1.1.0  2         dc1  <all>
ac53858f8c34  172.17.0.21:8301  alive   server  1.1.0  2         dc1  <all>
fc3aba2ddc25  172.17.0.22:8301  alive   server  1.1.0  2         dc1  <all>
|
可以看到已经有 3 个 Consul Server 启动了。
下面我们再来运行一个 Consul Client 作为服务注册与发现的端口:
1
|
docker run -d -p 8500:8500 --name=dev-consul-client -e CONSUL_BIND_INTERFACE=eth0 -e CONSUL_UI_BETA=true consul agent -retry-join 172.17.0.20 -bind 0.0.0.0 -ui -client 0.0.0.0
|
这里注意 -bind 与 -client 命令是你绑定的 IP 地址,这里我直接将其与 0.0.0.0 绑定,而 -e CONSUL_UI_BETA=true 则是用于启动新版本的 WebUI 界面,-ui 是启用 WebUI 界面。
启动完成之后我们可以访问已经启动的 Client Agent 了:
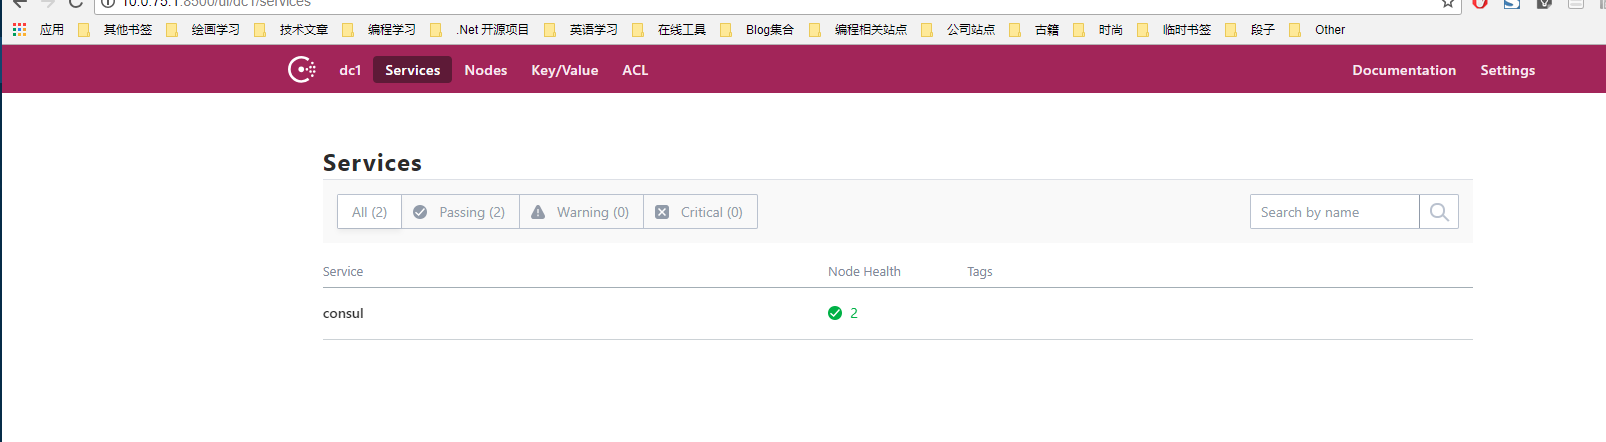
2.客户端与服务端编写
在这里我以 Abp 框架作为演示,如何编写一个支持 Consul 的 Grpc 服务端与 Grpc 客户端,在演示当中所使用到的 Abp.Grpc.Server 包与 Abp.Grpc.Client 包可以从 NuGet 站点当中搜索安装,其源代码我托管到 GitHub 上面的,地址为:https://github.com/GameBelial/Abp.Grpc,欢迎 Star。
2.1 Grpc 服务端编写
2.1.1 Abp 集成
首先建立一个标准的 ASP.NET Core Web Application 程序,引入 Abp、Abp.AspNetCore、Abp.Grpc.Server 包,项目取名为 Abp.Grpc.Server.Demo,类型选择空项目,在我们的 Startup 类当中编写如下代码:
 1
 2
 3
 4
 5
 6
 7
 8
 9
10
11
12
13
14
15
16
17
18
19
20
21
22
23
24
25
26
27
28
29
30
31
32
33
34
35
36
37
38
39
|
using Abp.AspNetCore;
using Microsoft.AspNetCore.Builder;
using Microsoft.AspNetCore.Hosting;
using Microsoft.Extensions.DependencyInjection;
using System;

namespace Abp.Grpc.Server.Demo
{
    public class Startup
    {
        // This method gets called by the runtime. Use this method to add services to the container.
        // For more information on how to configure your application, visit https://go.microsoft.com/fwlink/?LinkID=398940
        public IServiceProvider ConfigureServices(IServiceCollection services)
        {
            // 添加 MVC
            services.AddMvc();
            // 添加 ABP 框架,注意更改 ConfigureServices 返回值为 IServiceProvider
            return services.AddAbp<AbpGrpcServerDemoModule>();
        }

        // This method gets called by the runtime. Use this method to configure the HTTP request pipeline.
        public void Configure(IApplicationBuilder app, IHostingEnvironment env)
        {
            // 启用 ABP 框架中间件
            app.UseAbp();
            // 启用 MVC 中间件
            app.UseMvc(routes =>
            {
                routes.MapRoute(
                    name: "defaultWithArea",
                    template: "{area}/{controller=Home}/{action=Index}/{id?}");

                routes.MapRoute(
                    name: "default",
                    template: "{controller=Home}/{action=Index}/{id?}");
            });
        }
    }
}
|
2.1.2 建立项目启动模块
新建一个 AbpGrpcServerDemoModule 类,并编写以下代码:
 1
 2
 3
 4
 5
 6
 7
 8
 9
10
11
12
13
14
15
16
17
18
19
20
21
22
23
24
25
26
27
28
29
30
31
32
33
34
35
36
37
38
39
40
41
|
using Abp.AspNetCore;
using Abp.Grpc.Server.Extensions;
using Abp.Modules;

namespace Abp.Grpc.Server.Demo
{
	// 此处依赖 ABP 的 AspNetCore 模块与我们的 GRPC 服务模块
    [DependsOn(typeof(AbpAspNetCoreModule),
        typeof(AbpGrpcServerModule))]
    public class AbpGrpcServerDemoModule : AbpModule
    {
        public override void PreInitialize()
        {
            Configuration.Modules.UseGrpcService(option =>
            {
                // GRPC 服务绑定的 IP 地址
                option.GrpcBindAddress = "0.0.0.0";
                // GRPC 服务绑定的 端口号
                option.GrpcBindPort = 5001;
                // 启用 Consul 服务注册
                option.UseConsul(consulOption =>
                {
                    // Consul 服务注册地址
                    consulOption.ConsulAddress = "10.0.75.1";
                    // Consul 服务注册端口号
                    consulOption.ConsulPort = 8500;
                    // 注册到 Consul 的服务名称
                    consulOption.RegistrationServiceName = "TestGrpcService";
                    // 健康检查接口的端口号
                    consulOption.ConsulHealthCheckPort = 5000;
                });
            })
            .AddRpcServiceAssembly(typeof(AbpGrpcServerDemoModule).Assembly); // 扫描当前程序集的所有 GRPC 服务
        }

        public override void Initialize()
        {
            IocManager.RegisterAssemblyByConvention(typeof(AbpGrpcServerDemoModule).Assembly);
        }
    }
}
|
2.1.3 编写健康检查控制器

新建一个文件夹叫做 Controllers ,并且新建一个 HealthController 类,其内容如下:
 1
 2
 3
 4
 5
 6
 7
 8
 9
10
11
12
13
14
15
16
|
using Abp.AspNetCore.Mvc.Controllers;
using Microsoft.AspNetCore.Mvc;

namespace Abp.Grpc.Server.Demo.Controllers
{
    public class HealthController : AbpController
    {
        /// <summary>
        /// 健康检查接口
        /// </summary>
        public IActionResult Check()
        {
            return Ok("OJBK");
        }
    }
}
|
注意:此处应该继承自 AbpController 基类
2.1.4 编写 RPC 服务
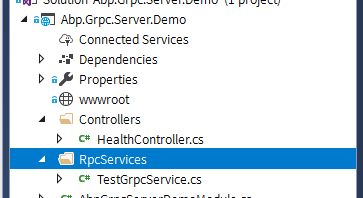
新建一个 RpcServices 文件夹,并且新建一个 TestGrpcService 文件,其内容如下:
 1
 2
 3
 4
 5
 6
 7
 8
 9
10
11
12
13
14
15
16
17
18
|
using MagicOnion;
using MagicOnion.Server;

namespace Abp.Grpc.Server.Demo.RpcServices
{
    public interface ITestGrpcService : IService<ITestGrpcService>
    {
        UnaryResult<int> Sum(int x, int y);
    }

    public class TestGrpcService : ServiceBase<ITestGrpcService>, ITestGrpcService
    {
        public UnaryResult<int> Sum(int x, int y)
        {
            return UnaryResult(x + y);
        }
    }
}
|
可以看到我们编写了一个简单的 Sum 方法,该方法接收两个 int 类型的参数,计算其和并返回。
2.1.5 编写 Dockerfile 文件
因为我们的 Consul 是放在 Docker 容器当中的,所以我们将我们的站点发布出去,并且编写一个 Dockerfile 文件,内容如下:
 1
 2
 3
 4
 5
 6
 7
 8
 9
10
11
|
FROM microsoft/dotnet
ENV ASPNETCORE_URLS http://+:5000
## 开放 5000 网站端口
EXPOSE 5000
## 开放 5001 RPC 端口
EXPOSE 5001

WORKDIR /app
COPY ./ .

ENTRYPOINT [ "dotnet","Abp.Grpc.Server.Demo.dll" ]
|
将其拷贝到发布好的站点,并且执行 docker build 命令:
 1
 2
 3
 4
 5
 6
 7
 8
 9
10
11
12
13
14
15
16
17
18
19
20
21
22
23
24
25
|
PS D:\Project\DEMO\Abp.Grpc.Server.Demo\Abp.Grpc.Server.Demo\bin\Release\netcoreapp2.1\publish> docker build -t grpc-server-demo .
Sending build context to Docker daemon   29.9MB
Step 1/7 : FROM microsoft/dotnet
 ---> d8381e1175a1
Step 2/7 : ENV ASPNETCORE_URLS http://+:5000
 ---> Using cache
 ---> da7659cff6d2
Step 3/7 : EXPOSE 5000
 ---> Using cache
 ---> 7ecfc480ad43
Step 4/7 : EXPOSE 5001
 ---> Using cache
 ---> 75f10934ad1e
Step 5/7 : WORKDIR /app
 ---> Using cache
 ---> dee9739da4cd
Step 6/7 : COPY ./ .
 ---> 1a5acc1f0298
Step 7/7 : ENTRYPOINT [ "dotnet","Abp.Grpc.Server.Demo.dll" ]
 ---> Running in a46efbabc7fc
Removing intermediate container a46efbabc7fc
 ---> 321201373ecf
Successfully built 321201373ecf
Successfully tagged grpc-server-demo:latest
SECURITY WARNING: You are building a Docker image from Windows against a non-Windows Docker host. All files and directories added to build context will have '-rwxr-xr-x' permissions. It is recommended to double check and reset permissions for sensitive files and directories
|
构建完镜像之后,我们运行该镜像:
1
|
docker run -d -p 5000:5000 -p 5001:5001 --name=grpc-server-demo grpc-server-demo
|
2.1.6 查看 Consul
来到 Consul 的 UI 界面查看效果:
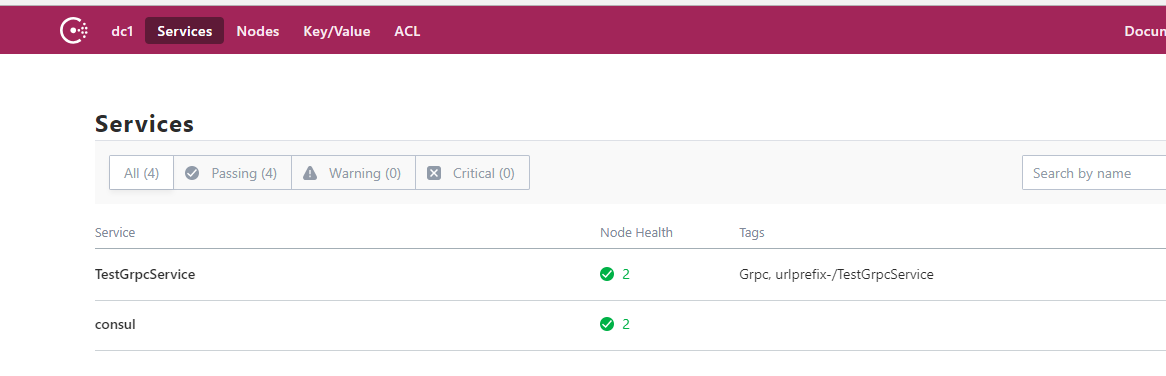
可以看到已经成功注册,说明已经成功了。
2.2 Grpc 客户端编写
2.2.1 Abp 集成
首先建立一个标准的 .Net Console 程序,引入 Abp.Grpc.Client 包,在我们的 Program 类当中编写如下代码:
 1
 2
 3
 4
 5
 6
 7
 8
 9
10
11
12
13
14
15
16
17
18
19
20
21
22
|
using Abp.Grpc.Client.Demo.RpcServices;
using Abp.Grpc.Client.Utility;
using System;

namespace Abp.Grpc.Client.Demo
{
    class Program
    {
        static void Main(string[] args)
        {
            using (var bootstrapper = AbpBootstrapper.Create<AbpGrpcClientDemoModule>())
            {
                bootstrapper.Initialize();

                Console.WriteLine("Press enter to stop application...");
                Console.ReadLine();
            }

            Console.WriteLine("Hello World!");
        }
    }
}
|
2.2.2 建立项目启动模块
然后我们新建一个 AbpGrpcClientDemoModule 类,该类一样是一个启动模块,用于配置连接信息:
 1
 2
 3
 4
 5
 6
 7
 8
 9
10
11
12
13
14
15
|
using Abp.Grpc.Client.Configuration;
using Abp.Grpc.Client.Extensions;
using Abp.Modules;

namespace Abp.Grpc.Client.Demo
{
    [DependsOn(typeof(AbpGrpcClientModule))]
    public class AbpGrpcClientDemoModule : AbpModule
    {
        public override void PreInitialize()
        {
            Configuration.Modules.UseGrpcClient(new ConsulRegistryConfiguration("10.0.75.1", 8500, null));
        }
    }
}
|
很简单,直接配置 Consul 注册的 IP 与端口号即可。
2.2.3 建立 RPC 接口定义
要调用我们 Server 提供的 RPC 端口的话,得编写一个接口定义,就是我们在 Server 项目里面写的那个,新建一个 ITestGrpcService 接口,内容如下:
1
2
3
4
5
6
7
8
9
|
using MagicOnion;

namespace Abp.Grpc.Client.Demo.RpcServices
{
    public interface ITestGrpcService : IService<ITestGrpcService>
    {
        UnaryResult<int> Sum(int x, int y);
    }
}
|
2.2.4 调用 RPC 接口
 1
 2
 3
 4
 5
 6
 7
 8
 9
10
11
12
13
14
15
16
17
18
19
20
21
22
23
24
25
26
27
28
|
using Abp.Grpc.Client.Demo.RpcServices;
using Abp.Grpc.Client.Utility;
using System;

namespace Abp.Grpc.Client.Demo
{
    class Program
    {
        static void Main(string[] args)
        {
            using (var bootstrapper = AbpBootstrapper.Create<AbpGrpcClientDemoModule>())
            {
                bootstrapper.Initialize();

                // 调用接口
                var connectionUtility = bootstrapper.IocManager.Resolve<IGRpcConnectionUtility>();
                var result = connectionUtility.GetRemoteService<ITestGrpcService>("TestGrpcService").Sum(10, 5).ResponseAsync.Result;
                // 展示结果
                Console.WriteLine("Result:" + result);

                Console.WriteLine("Press enter to stop application...");
                Console.ReadLine();
            }

            Console.WriteLine("Hello World!");
        }
    }
}
|
调用接口的话,需要注入 IGRpcConnectionUtility 工具类,使用其 GetRemoteService 方法就可以调用你的远程方法,记住一定要传入有效的服务名称。
2.2.5 编写 Dockerfile 文件
一样的,我们新建一个 Dockerfile 文件,将我们的 client 也打包成镜像:
1
2
3
4
5
6
|
FROM microsoft/dotnet

WORKDIR /app
COPY ./ .

ENTRYPOINT [ "dotnet","Abp.Grpc.Client.Demo.dll" ]
|
内容很简单,一样的复制到发布成功的文件夹,构建镜像:
1
|
docker build -t grpc-client-demo .
|
构建之后运行:
1
|
docker run grpc-client-demo
|
不出意外的话会看到如下输出:
1
2
3
4
|
PS D:\Project\DEMO\Abp.Grpc.Client.Demo\Abp.Grpc.Client.Demo\bin\Release\netcoreapp2.1\publish> docker run grpc-client-demo
Result:15
Press enter to stop application...
Hello World!
|

3.代码分析
抛开 ABP 框架部分的代码,其实要实现服务注册很简单,核心就是 ConsulClient 这个类,下面就来分析一下 Abp.Grpc 库里面的代码。
3.1 注册服务
注册服务其核心就在于 ConsulClient.Agent.ServiceRegister() 方法,通过传入一个构造好的 AgentServiceRegistration 对象就可以成功注册一个服务到 Consul。
例如:
 1
 2
 3
 4
 5
 6
 7
 8
 9
10
11
12
13
14
15
16
|
_agentServiceRegistration = new AgentServiceRegistration
{
	ID = Guid.NewGuid().ToString(),// 唯一ID
	Name = config.RegistrationServiceName,// 注册的服务名称
	Address = currentIpAddress, // 服务提供者地址
	Port = config.GrpcBindPort, // 服务提供者端口
	Tags = new[] { "Grpc", $"urlprefix-/{config.RegistrationServiceName}" }, // 注册的服务标签
	Check = new AgentServiceCheck // 健康检查
	{
		DeregisterCriticalServiceAfter = TimeSpan.FromSeconds(5), // 取消注册时间
		Interval = TimeSpan.FromSeconds(10), // 检查间隔
		Status = HealthStatus.Passing, // 检查通过的状态
		Timeout = TimeSpan.FromSeconds(5), // 超时时间
		HTTP = $"http://{currentIpAddress}:{config.ConsulHealthCheckPort}/health/check" // 健康检查接口地址
	}
};
|
构建成功后通过 ConsulClient.Agent.ServiceRegister() 方法即可注册到 Consul。
取消注册则是通过 ConsulClient.Agent.ServiceDeregister 方法。
3.2 发现服务
服务发现相较于服务注册简单得多,只需要通过 ConsulClient.Catalog.Services 遍历其结果即可获得所有节点,并且通过 LINQ 来筛选出指定 tag 的服务。
4.其他相关参考资料
田园里的蟋蟀:Docker & Consul & Fabio & ASP.NET Core 2.0 微服务跨平台实践)
Edison Chou:.NET Core微服务之基于Consul实现服务治理
Cecilphillip:Using Consul for Service Discovery with ASP.NET Core
5.所使用到的代码
Abp.Grpc 库代码:https://github.com/GameBelial/Abp.Grpc
DEMO 代码:
https://github.com/GameBelial/Abp.Grpc.Server.Demo
https://github.com/GameBelial/Abp.Grpc.Client.Demo